Engineering
Build Inventory Management App in Retool with ApyHub Currency API
Learn how to use Retool to build an inventory management app with integrated currency conversion for seamless global operations.
SO
Sohail Pathan
Last updated on May 24, 2023
Build Inventory Management App in Retool with ApyHub Currency API
Introduction
In this tutorial, we're going to use retool to create our very own inventory application that will make product creation and management a breeze. But that's not all - we'll also add something new - we will show how to display product prices in both USD and EUR using the ApyHub currency conversion API. This way our application will be able to cater to potential customers from all around the globe (in this specific example we are going to focus on the conversion to EUR but the service we are going to use for that also supports other currencies.
So, whether your plan is managing your product information model (PIM) for your own web store or you just want to get a handle on inventory for any other purpose (such as internal equipment inventory), this tutorial has got you covered.
The application we are going to create will allow users to:
- Create a product inventory: Add, View, and modify products of an inventory.
- Display the price of these products in different currencies, in USD and EUR. In order to be able to follow this tutorial without any problem, you will need to have:
- Basic understanding of JavaScript and SQL
- A Retool account (sign up at https://retool.com/)
- An ApyHub account (sign up at https://apyhub.com/)
Step 1: For existing Retool users: Sign in to retool. If you don't have a retool account yet, you should first create one before continuing.
Step 2: Create a new application and pick the option to start using a template. Search for the Inventory Management Template. Then, click on the “Create App From template” button.
To run the project, click the Toggle View mode button on the right. Upon seeing that the app is running correctly, we can switch to design mode and modify the app accordingly.
Step 3: Currently, our app allows adding products to an inventory with the unit price in USD. We want to enhance this functionality by enabling the addition of products in two currencies: USD and EUR. Additionally, we aim to display the total sum of items in both currencies. However, before proceeding, we need to establish a database to store these details.
Let's begin! Retool offers a built-in database feature that allows us to create a table with the necessary columns.
Here’s how can you do that:
- To create the database in Retool, locate the Retool logo button at the top left corner.
- Click on the Retool logo button, and a drop-down menu will appear.
- From the drop-down menu, select the Database option.
You will see the sample users table. Now, we will create our inventory table by clicking on the + button.
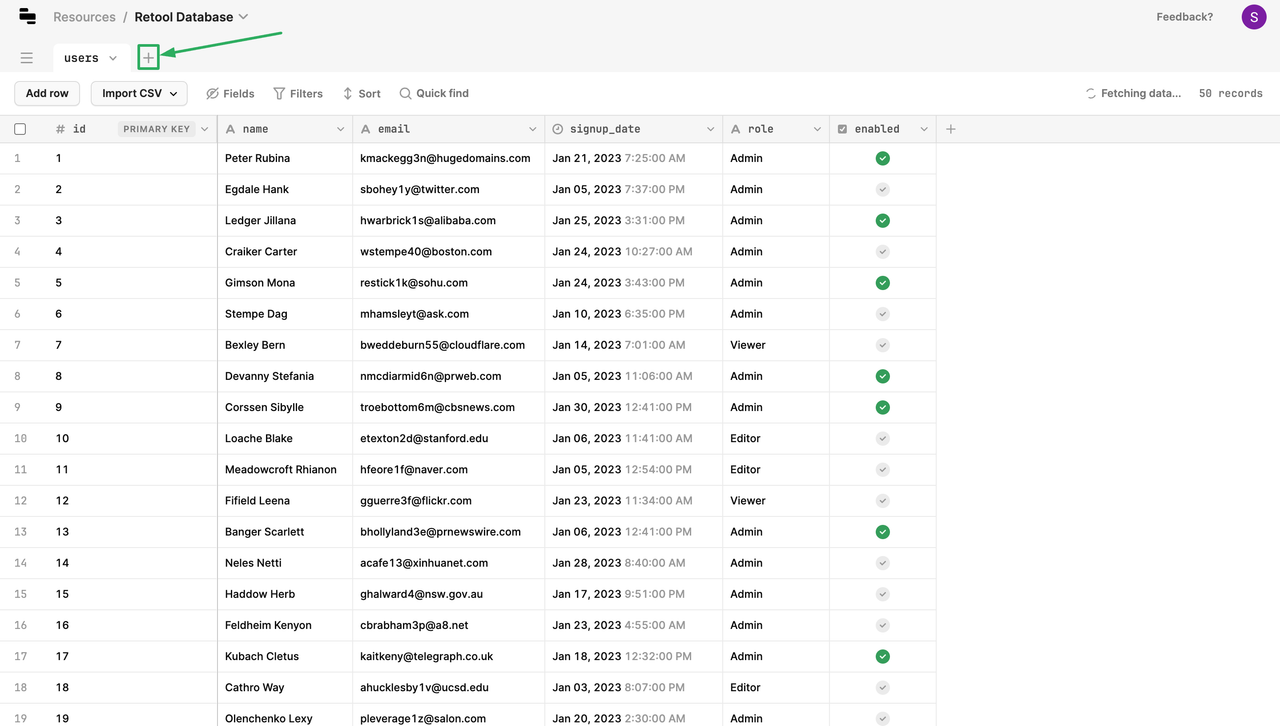
A popup window New Table will appear, allowing you to name the table. Enter the name
apyproducts and make sure to check the option for including the created_at column.
A table will be created with two columns id and created_at. That’s nice right?🙂
Let's remember our goal: We want to add functionality to let users add products in inventory along with their quantities in stock, and let them specify the value of the products in a base currency (USD) and get the value in EUR automatically and finally calculate the total value of the products in inventory in both currencies.
In order to do that, we will need 7 columns in our table i.e.
- Product Name
- Product Quantity
- Base Product Price (USD)
- Product Updated Time
- Product Price ( EUR)
- Total Price (USD), and
- Total Price (EUR)
We have two ways to create these columns.
Option 1: Add the columns manually, one by one.
By clicking on the +, A pop-up window to add select the column type. Adding columns to the inventory table is as easy as following these steps.
- For the Product Name Column, Add Field Name as
product_nameand choose Field Type as Text. Click Save. - For the Product Quantity Column, Add Field Name as
product_quantityField Type as integer and Number Type as Integer. Click Save - For the Base Product Price (USD) Column, Add Field Name as
product_price_usdField Type as Number, Number Type as decimal and Decimal Places as 2 (1.00). Click Save - For the Product Price (USD) Column, Add Field Name as
product_price_eurField Type as Number, Number Type as decimal and Decimal Places as 2 (1.00). Click Save - For Total Price ( USD ) Column, Add Field Name as
product_price_usdField Type as Number, Number Type as decimal and Decimal Places as 2 (1.00). Click Save - For Total Price ( EUR ) Column, Add Field Name as
total_price_eurField Type as Number, Number Type as decimal and Decimal Places as 2 (1.00). Click Save - For Product Updated Time, Add Field Name as
updated_atand choose Field Type as Date + Time. Click Save

OR
Option 2: Import
Use the CSV file to import the table schema into the database. This file will automatically generate and populate the table with the sample values.
Step 4: The
apyproducts database has now been successfully created. It’s now time to test the table by referring it to our User Interface.For that, choose the products query from the Code section on the left. Change the Resource reference from onboarding_db to Retool Database. Write one query to display the data of the
apyproducts in the editor.Click on the Save and Run Button.
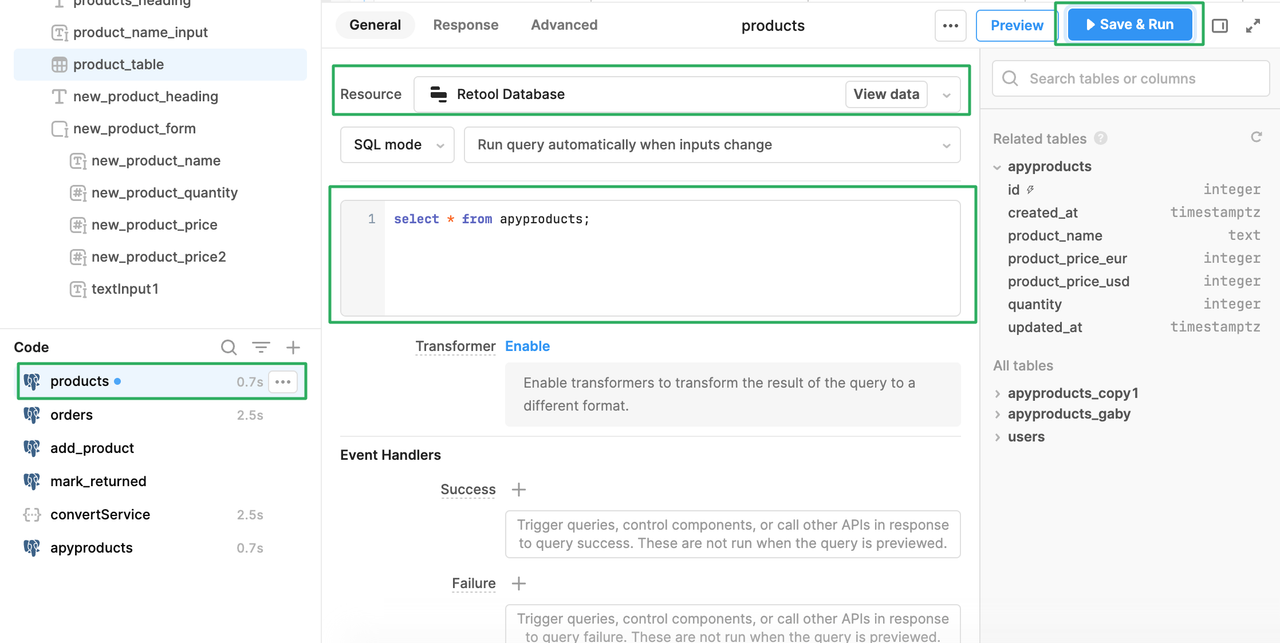
Once you click on Save and Run, The SQL query triggers in the database and returns the response with the schema that we have just created.

We can add the reference to the database from the UI by selecting the Product Table on Design Canvas. On the right, Click Select Inspect, and Add the data as
{{apyproducts.data}} and Click on Run.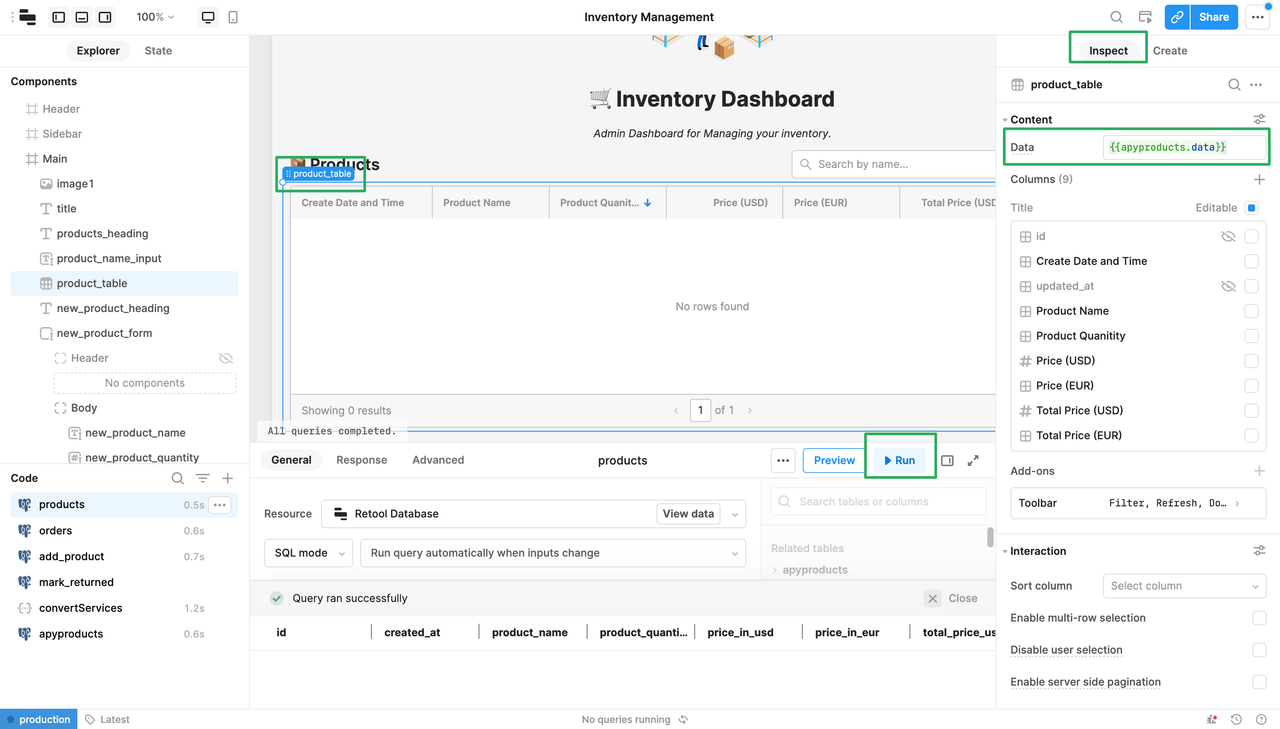
Step 5: Now, we need to build the currency conversion functionality that converts the currency from USD to EURO. For that, we will use ApyHub Currency Converter Utility.
In order to do that we will need an API key so we can call an API for authentication and authorisation purposes, ensuring secure and controlled access to the API's functionalities and data.
Here is how we can generate an API Key in ApyHub:
If you don't have one, create an account on ApyHub: https://apyhub.com/auth/signup
Now that we have an account, log in to ApyHub. Click on the API Keys Button in the left navigation bar → Select the option to create a new API key → Assign the name to API Key Eg. new-retool-inventory-app → Copy the token that is generated. Done 👍

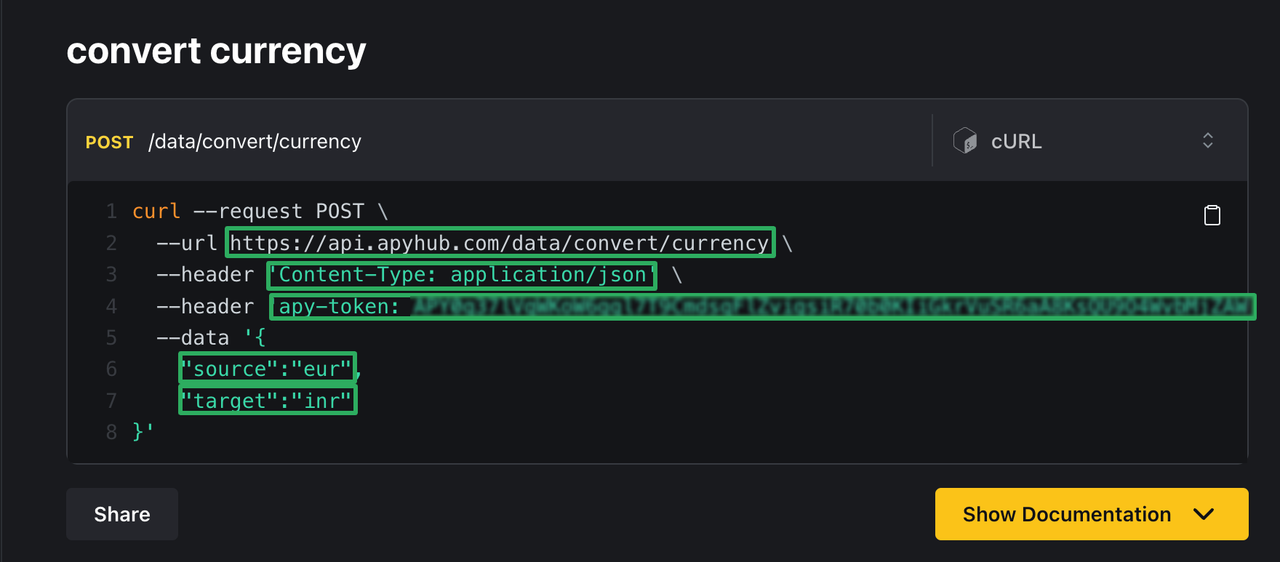
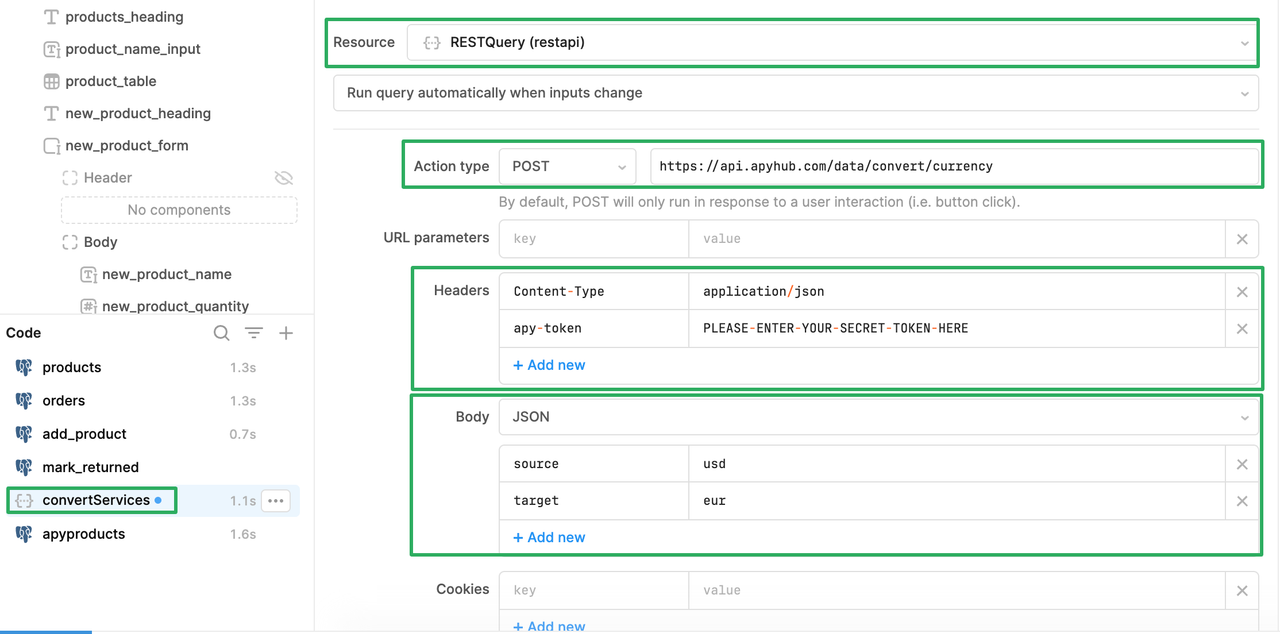
Step 6: Now we need to set up a Resource Service in Retool that allows us to connect to an ApyHub currency conversion service. For that, we have a requirement of URL (Endpoint), Headers and Body which you can find by clicking on this ApyHub Currency Converter Utility Page.
You can find the ➕ symbol in the Code Section in the bottom left. Click on it and Select Resource Query and choose RESTQuery (restapi).
Action Type:
Header:
| Content-Type | application/json |
|---|---|
| apy-token | PLEASE-ENTER-YOUR-SECRET-TOKEN-HERE |
Body: Choose JSON from the drop-down.
| source | usd |
|---|---|
| target | eur |
Click on Run to test the API. Once successfully called, You will able to see Query Ran Successfully and below that the response in JSON as
data: 0.92009.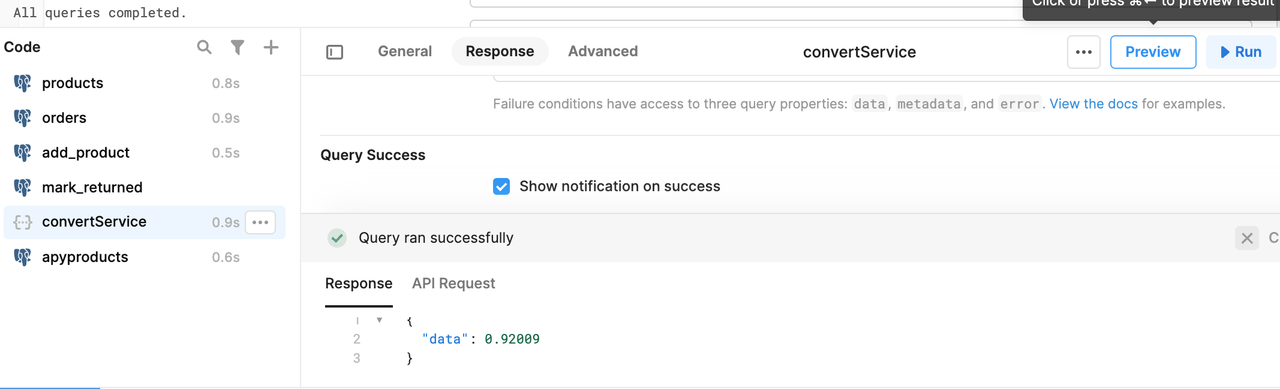
If the API runs successfully, assign it a suitable name as we will rely on this name to retrieve the data using the service. To provide a reference, we will refer to this service as
conversionService.Note: If you encounter any errors, please review the preceding steps and ensure that you have inputted the correct values.
We are now done with creating the database and the conversion service.
We will now build the most crucial functionality of this application. While adding the products to the inventory, we need the input value of Product Name, Quantity, and Price in USD only.
We have the
conversionService which provides the latest rate of euro from US dollars hence we just need the formula to calculate the Unit Price in EUR.
Step 7: Click on the +Add New Product form. On the right, there’s an Inspect Panel. You will see the notification of the deprecated element and a backlink text ad Upgrade By clicking on the same, the UI element will be upgraded to the latest version.Importantly, You have to upgrade all the existing input fields.
Step 8: To calculate the remaining values, we need three additional input fields i.e. Unit Price (EUR), Total Amount (USD) and Total Amount (EUR).
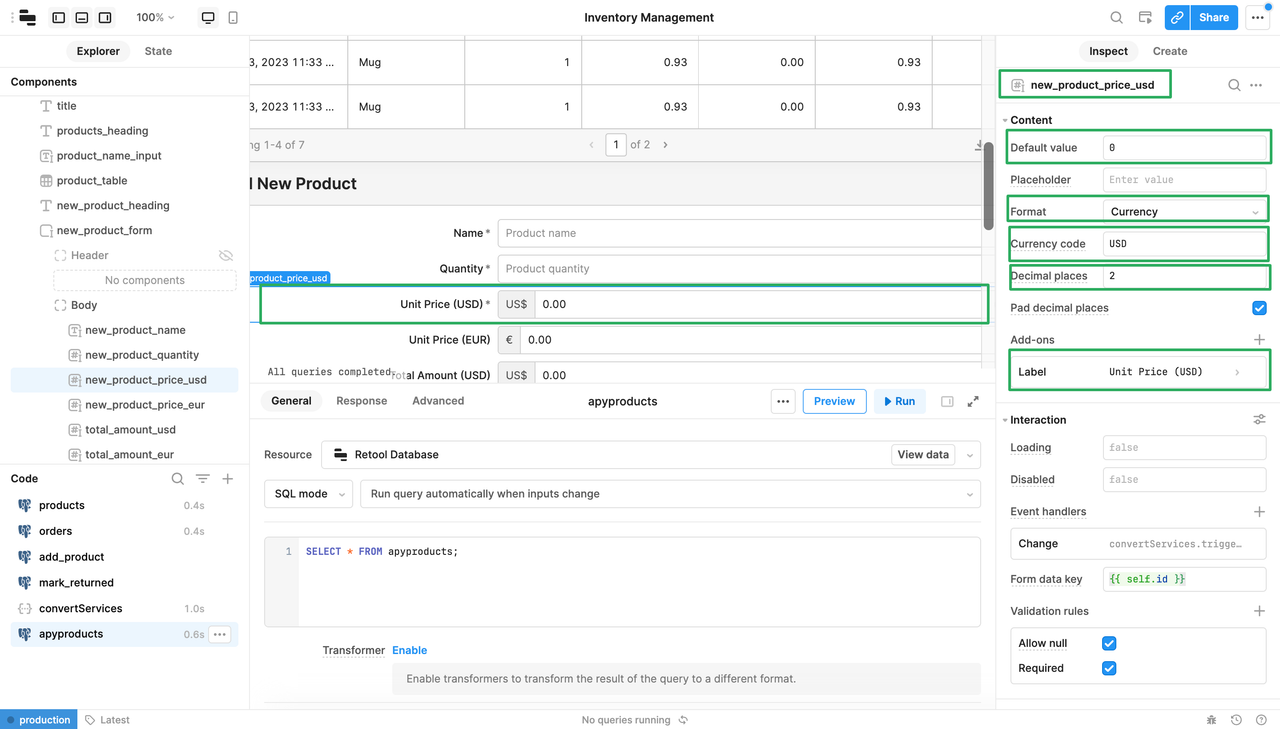
First of all, change the label of Unit Price (in cents) to Unit Price (USD) and rename the id from
new_product_price to new_product_price_usdMap the below values in the input field:
- Default Value: 0
- Input format: Currency
- Currency Code: USD
- Decimal Places: 2
- Label: Unit Price (USD )
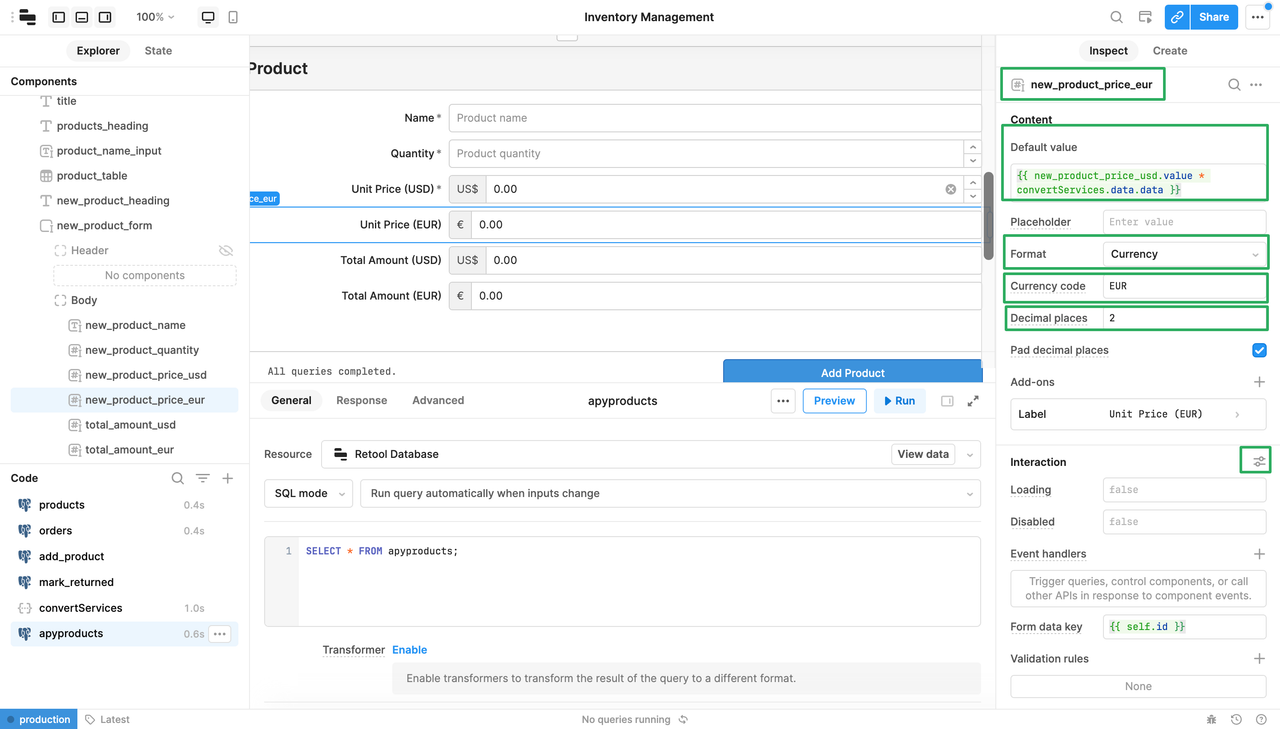
Step 9: On the right panel, click Create. From the Component Directory, drag the Number Input field below to the Unit Price (in cents) field and rename the id as
new_product_price_eurYou can follow this GIF for a more visual explanation.
Since it’s a currency input field, we need to provide the formula to get the Product Price in EUR and validate to ensure we get the value in decimal format and read-only - because it gets computed automatically.
To get the Product Price in EUR, Multiply the product price in USD with a Rate of 1 EUR i.e. Product Unit Price (EUR) = Product Unit Price ( USD ) x Rate of 1 EUR.
Map the below values in the input field:
- Default Value:
{{new_product_price_usd.value * conversionService.data.data}} - Input format: Currency
- Currency Code: EUR
- Decimal Places: 2
- Label: Unit Price (EUR)
- Make the Read-only: True ( Go to Interaction Section, Click on the setting icon button on the right, and write true )
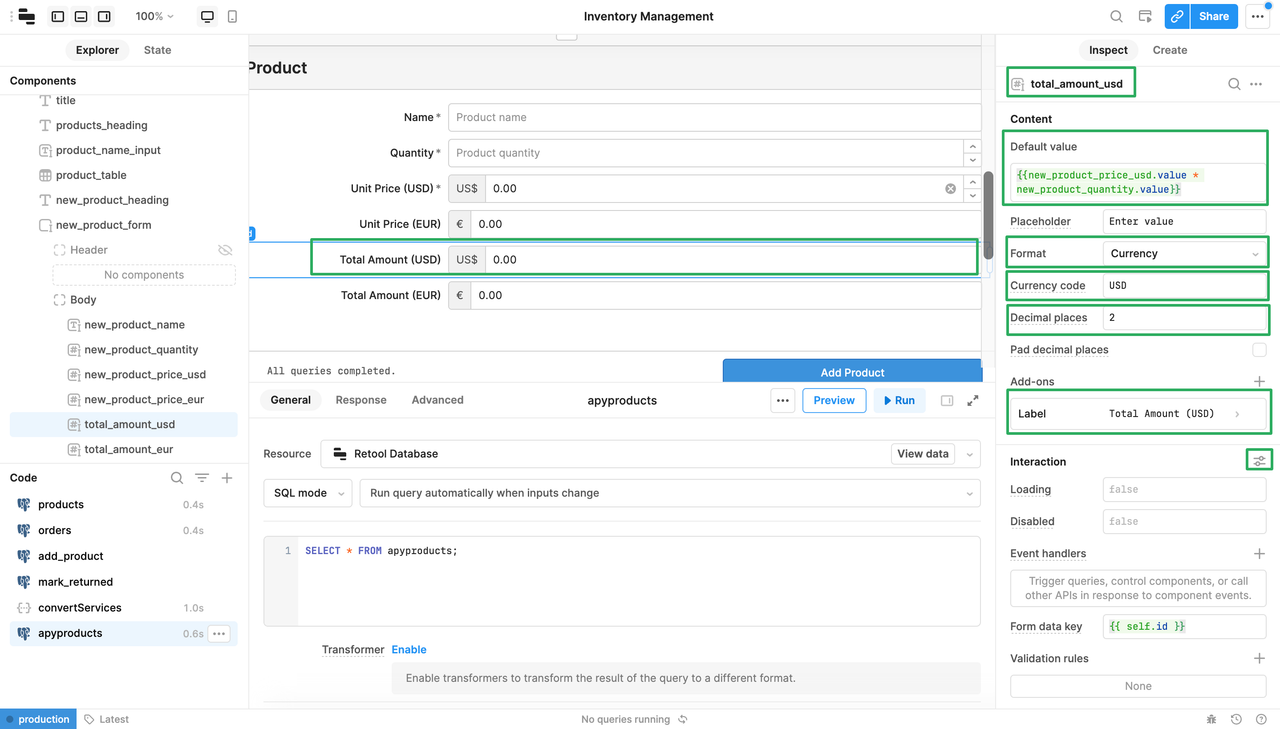
Step 10: Similarly for Total Amount (USD), on the right panel, click Create. From the Component Directory, drag the Number Input field below to the Unit Price (in EUR) field and rename the id to
total_price_usdTo get the total Amount in USD, multiply the Product Price in USD by a product quantity i.e.
Total Amount (USD) = Product Unit Price ( USD ) x Quantity
Map the below values in the input field:
- Default Value:
{{new_product_price_usd.value * new_product_quantity.value}} - Input format: Currency
- Currency Code: USD
- Decimal Places: 2
- Label: Total Amount (USD)
- Make the Read-only: True. ( Go to Interaction Section, Click on the setting icon button on the right, and write true )
Step 11: Finally for Total Amount (EUR), On the right panel, click Create. From the Component Directory, drag the Number Input field below to the Unit Price (in EUR) field and give the id as
total_price_eurTo get the Product Price in EUR, multiply the Product Price in USD by the product quantity i.e. Total Amount(EUR) = Product Unit Price(EUR) x Quantity.
Map the below values in the input field.
- Default Value:
{{new_product_price_eur.value * new_product_quantity.value}} - Input format: Currency
- Currency Code: EUR
- Decimal Places: 2
- Label: Total Amount (EUR)
- Make the Read-only: True ( Go to Interaction Section, Click on the setting icon button on the right, and write true )
Yayy!! It looks like our +Add to Product form is ready. We will now send the input data to the database via the SQL query.
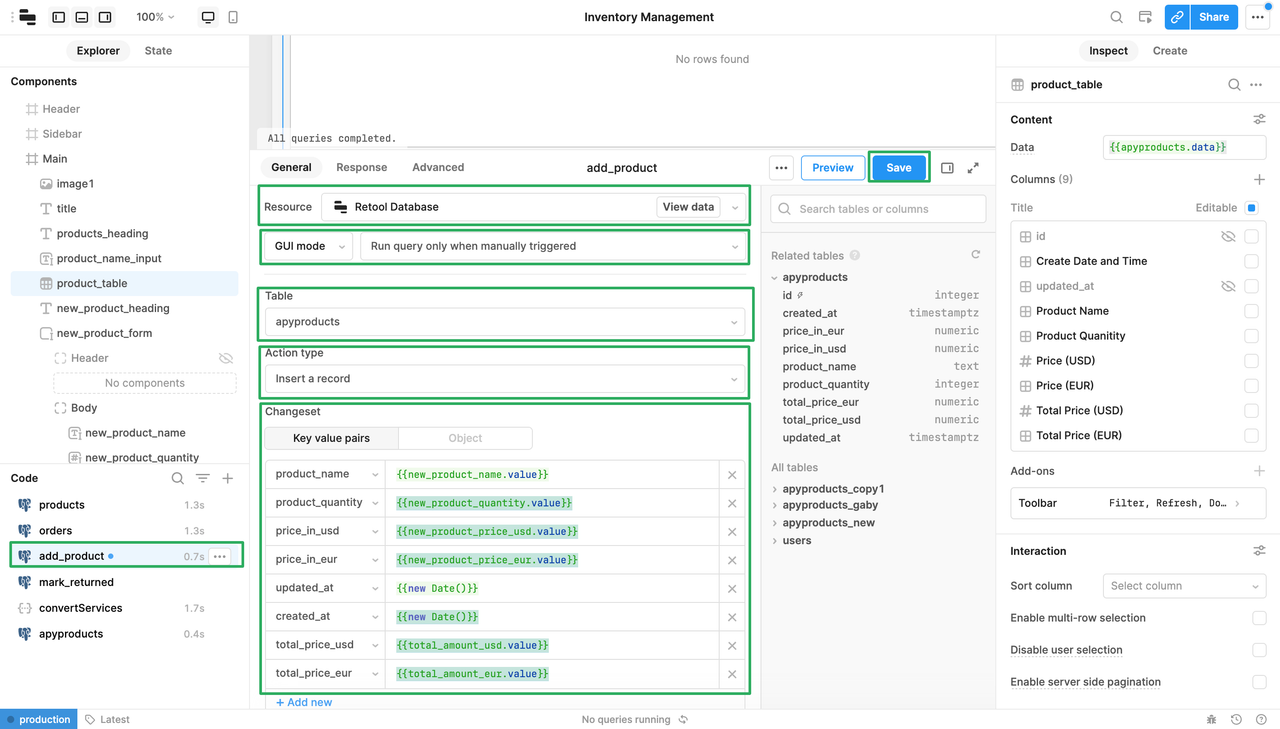
Step 12: Now we will add the functionality of saving the new Item details in the database. Here, we will map the id of the input fields in SQL query items. Let’s do it.
In the Code Section, we will modify the add_product query. Change the following:
- Resource: Retool Database.
- GUI Mode: Run Query Only when manually Triggered.
- Select Table:
apyproducts - Action Type: Insert a Record.
- Action Type: Insert a Record.
- Changeset: Key-Value Pairs ( Key is Column Name in
apyproductstable, Values is theidin put fields of +Add the Product Form )
| Key | Value |
|---|---|
product_name | {{new_product_name.value}} |
product_quantity | {{new_product_quantity.value}} |
price_in_eur | {{new_product_price_usd.value}} |
price_in_usd | {{new_product_price_eur.value}} |
updated_at | {{new Date()}} |
created_at | {{new Date()}} |
total_price_usd | {{total_amount_usd.value}} |
total_price_eur | {{total_amount_eur.value}} |
After carefully mapping the value, click on Save.
The
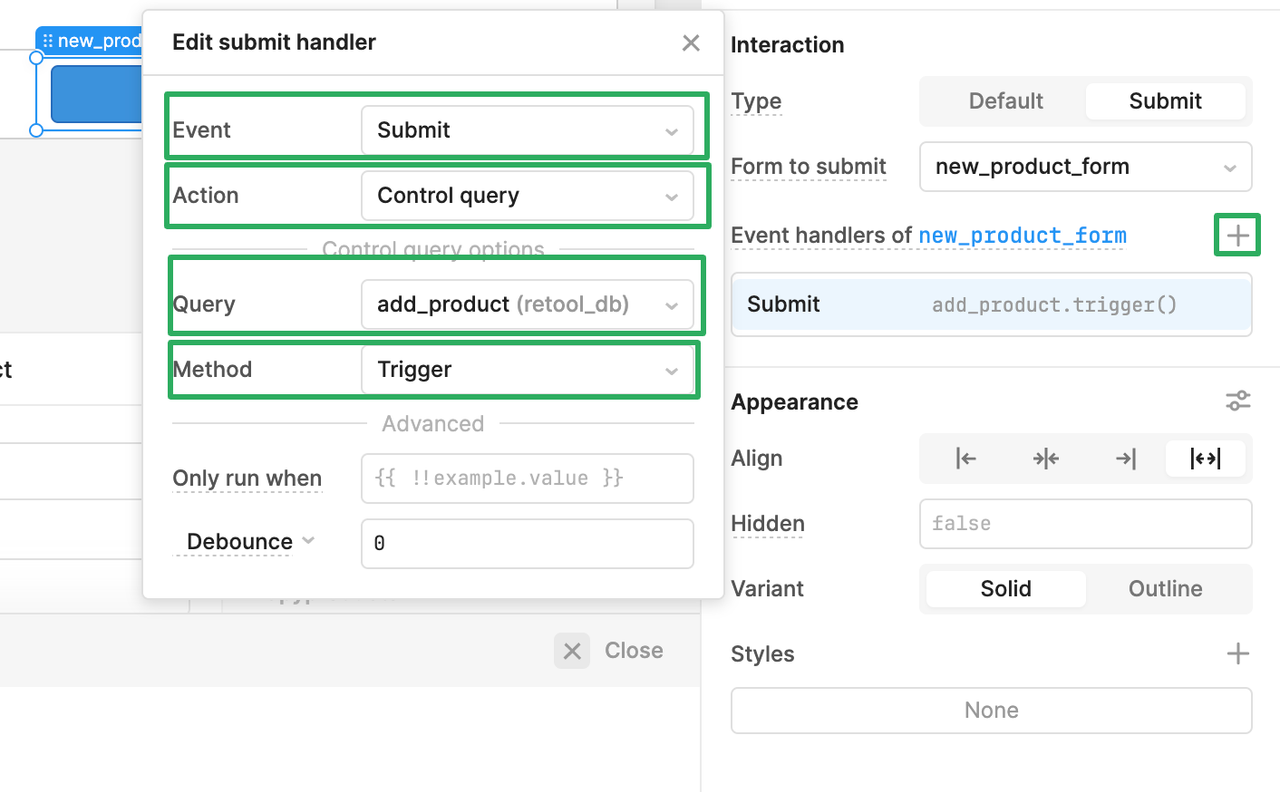
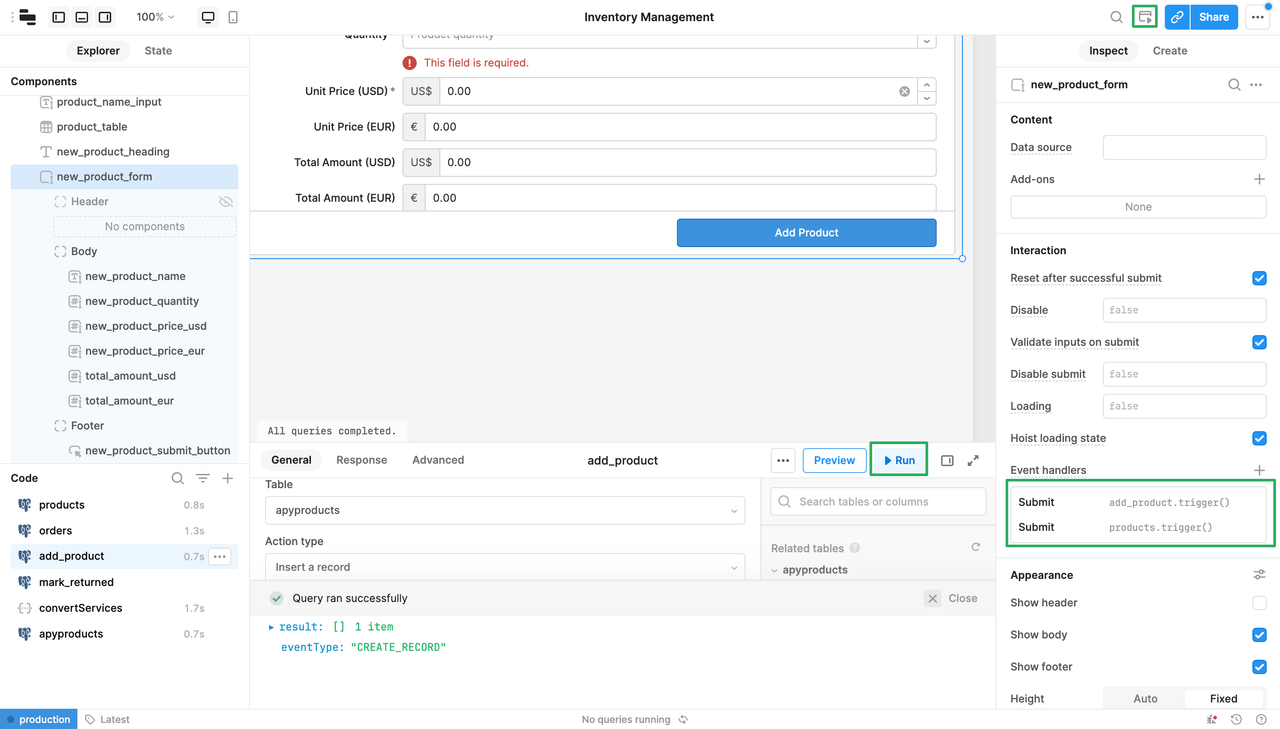
add_product query will now take the value from the input fields and add it to the database whenever it triggers. We will trigger this query when the user clicks on Add Product ButtonStep 13: We will go back to +Add the Product form. Click on Add Product button. Choose Type as Submit and Form to Submit as ID_OF_FORM. In Event Handlers, Click on the + Button and add the Submit handler with the following conditions.
- Event: Submit
- Action: Control Query
- Query:
add_product(retool_db) - Method: Trigger
Finally, we will trigger the
products query followed by add_product which will refresh the inventory database with newly added items and show on the User Interface.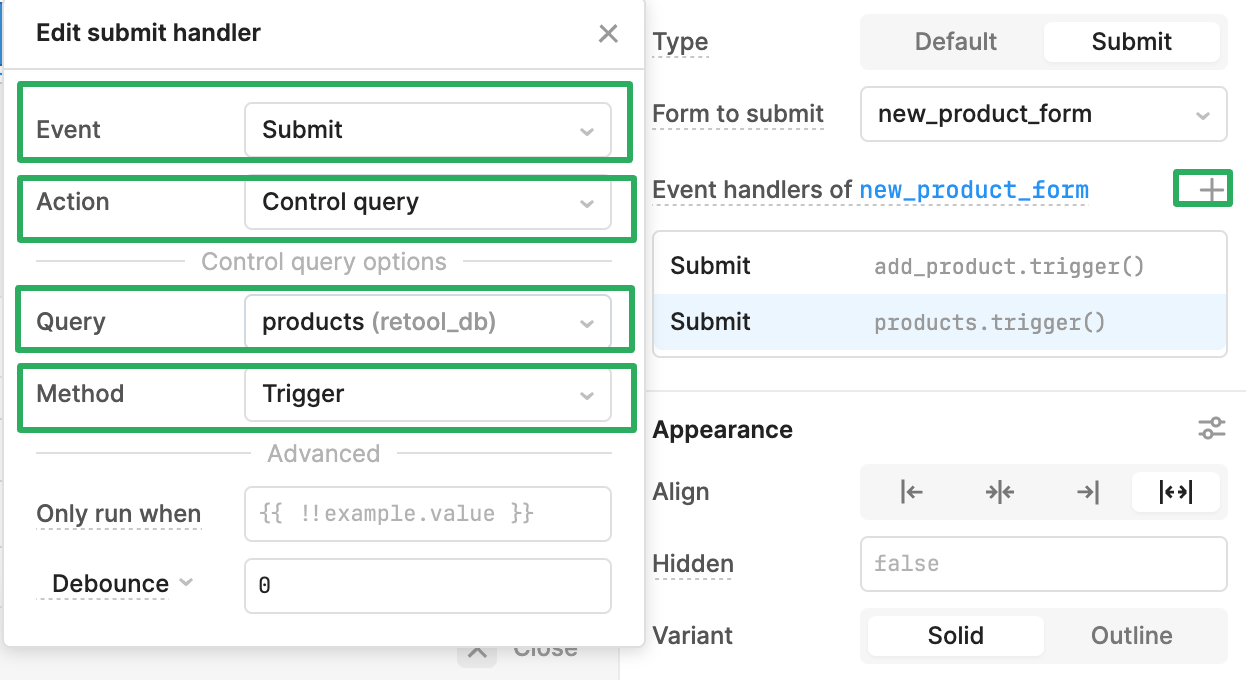
Final Step: Run the app by clicking on Run and Clicking on Toggle Preview Mode.
TA-DAAA 🤩
We have now successfully built an inventory management app using Retool and ApyHub. With Retool's flexibility and ApyHub's powerful API integration capabilities, we can further enhance the platform with additional features and integrations to meet specific business needs. ApyHub offers 50+ utilities (from conversions, generation, extraction and other data utilities etc), check them out to find utilities that address your specific use cases.